Today marks the one-year birthday of this blog! I can’t believe how fast the past year has flown by…both in the blog world and real-life world. A LOT has happened in this past year (um, I made a HUMAN BEING. What?!).
One year ago, I finally worked up the courage to document my cooking after months (years?) of self doubt. I didn’t think anyone would care about what I had made or had to say about…well…anything. I didn’t think blogging was for me, even though I LOVED reading food blogs and was fascinated and impressed by people’s constant creativity. I found those people to be far more impressive than myself. Quite frankly, I didn’t think I could compete.
I’m a creative person by nature, and my real-life job doesn’t lend itself toward a ton of creative freedom (read: none). While I am perfectly satisfied at said job, I knew I needed a creative outlet. Cooking had served as one creative outlet for me since my early 20s, and being an English major, I had always loved to write. Starting a food blog kinda seemed like a no brainer. BUT, my self consciousness won over time and time again, and I would snuff out the idea as quickly as it came to me…over and over.
I’m not sure what made me finally take the plunge…because I’m still totally self conscious about anything I post on this blog! Even a year into it. Even after I’ve received such a great reaction from friends, family, and…strangers. I still read and re-read every single post/recipe before I hit the “Publish” button. I still agonize over my obviously-still-a-beginner photography. And I constantly worry about the recipes I’m putting out there. Are they good enough? Different enough? Delicious enough?
I’m my own worst enemy. Always have been.
That all being said, I’m proud of what I’ve done here in the last year. I made a deal with myself in the beginning that I wouldn’t focus on the popularity of the blog. I was not going to torture myself over the number of hits or page views I was getting. Instead, I wanted to focus on putting GOOD CONTENT out there. Something I could look back on and say “hey, good job.” I wanted to share my recipes and inspirations with people and not worry so much about how they were received. I needed a creative outlet. That’s all this blog needed to be.

Once I turned off the knee-jerk inclination to compare myself to others, I was happy with what I was putting out there. It’s been an evolution. My writing is my writing. Casual and light. Take it or leave it. My photography is still an area where I have much room to improve, but I think I’ve already improved in some ways (despite the pictures for this post – I hate every single one. Oh, the irony). Most of all, though, I’ve relished in the connections I’ve made with people over my favorite thing on Earth: FOOD. Those connections span my personal life and the blog world. People I’ve known for years were suddenly interested in trying out my recipes and giving me feedback. And strangers were postingabout/pinning my content on a daily basis (which is still shocking to me, heh). It’s been an overwhelmingly satisfying and humbling experience thus far.

OK, enough rambling. Let’s get to the good stuff: this freakin’ amazing cake.
If you’re like me, you are no expert at baking and assembling layer cakes. I have made a few (this one is a repeat offender), and they always taste a hell of a lot better than they look. And I’m OK with that. If you happen to be an expert cake decorator, then please excuse my lame attempt. Just trust me that it TASTES fantastic. That’s the most important thing, people! If you’re an “eat with your eyes” type of person, then just close your freakin’ eyes! Hah. You’ll still be a happy camper, I promise.
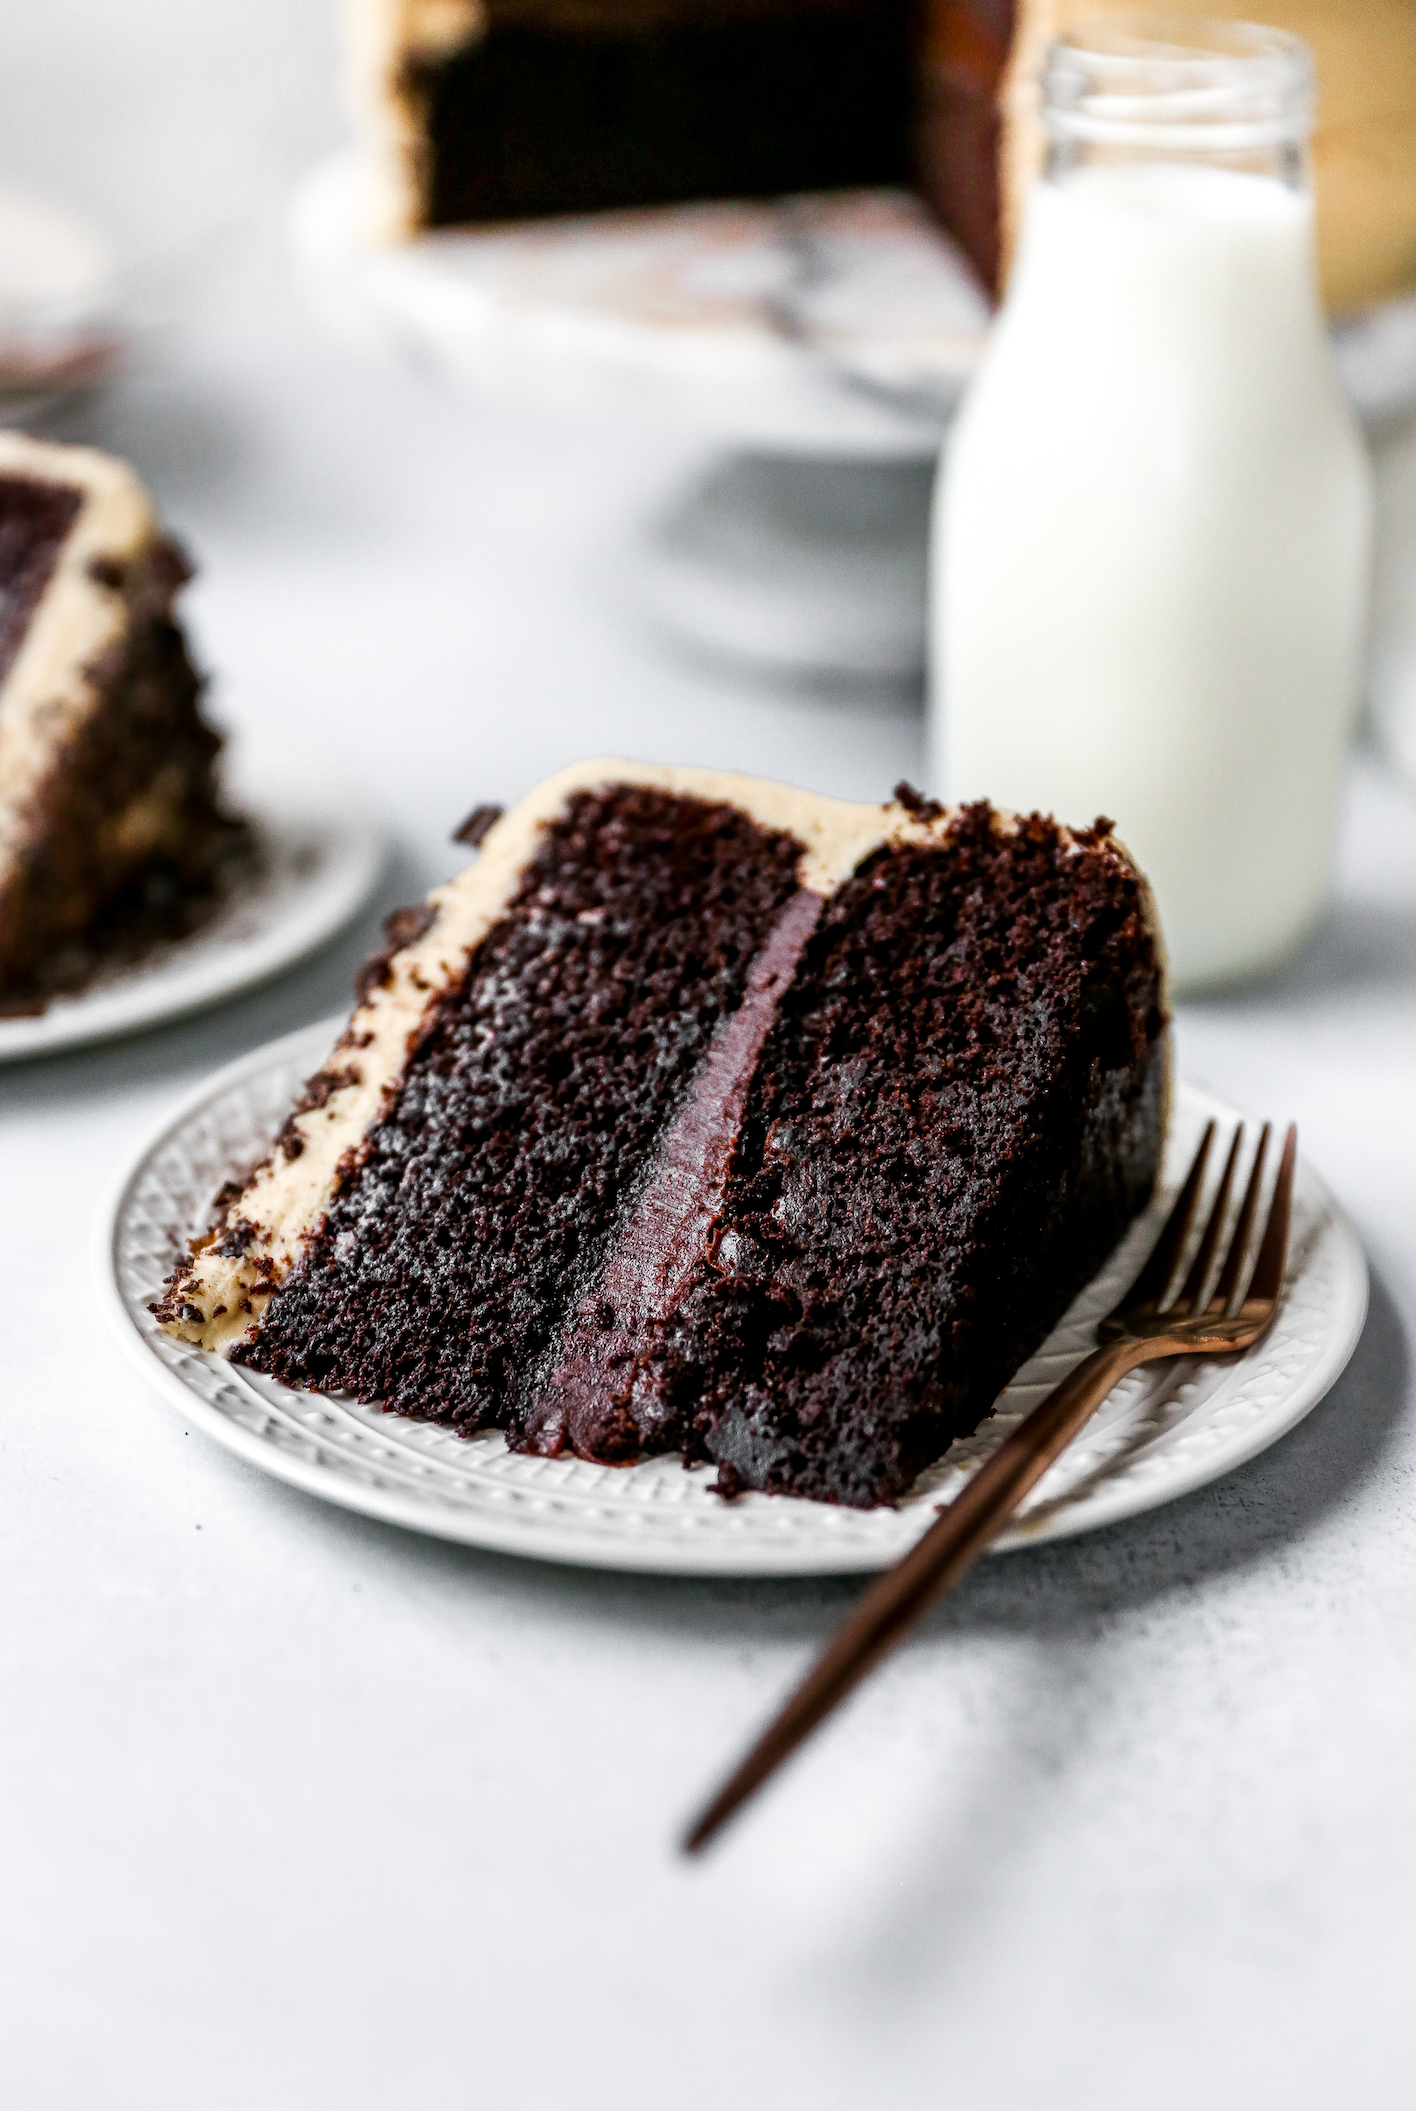
This cake was something I came up with a couple years ago. I had a sudden and random urge to make a layer cake. There was no occasion or reason to do so; I just had the urge. Chocolate cake has always been a so-so variety in my eyes. It was always kind of bland, never chocolatey enough. I would much rather have vanilla cake. But I knew a delicious chocolate cake had to exist out there! And I was determined to put together a recipe for just that.
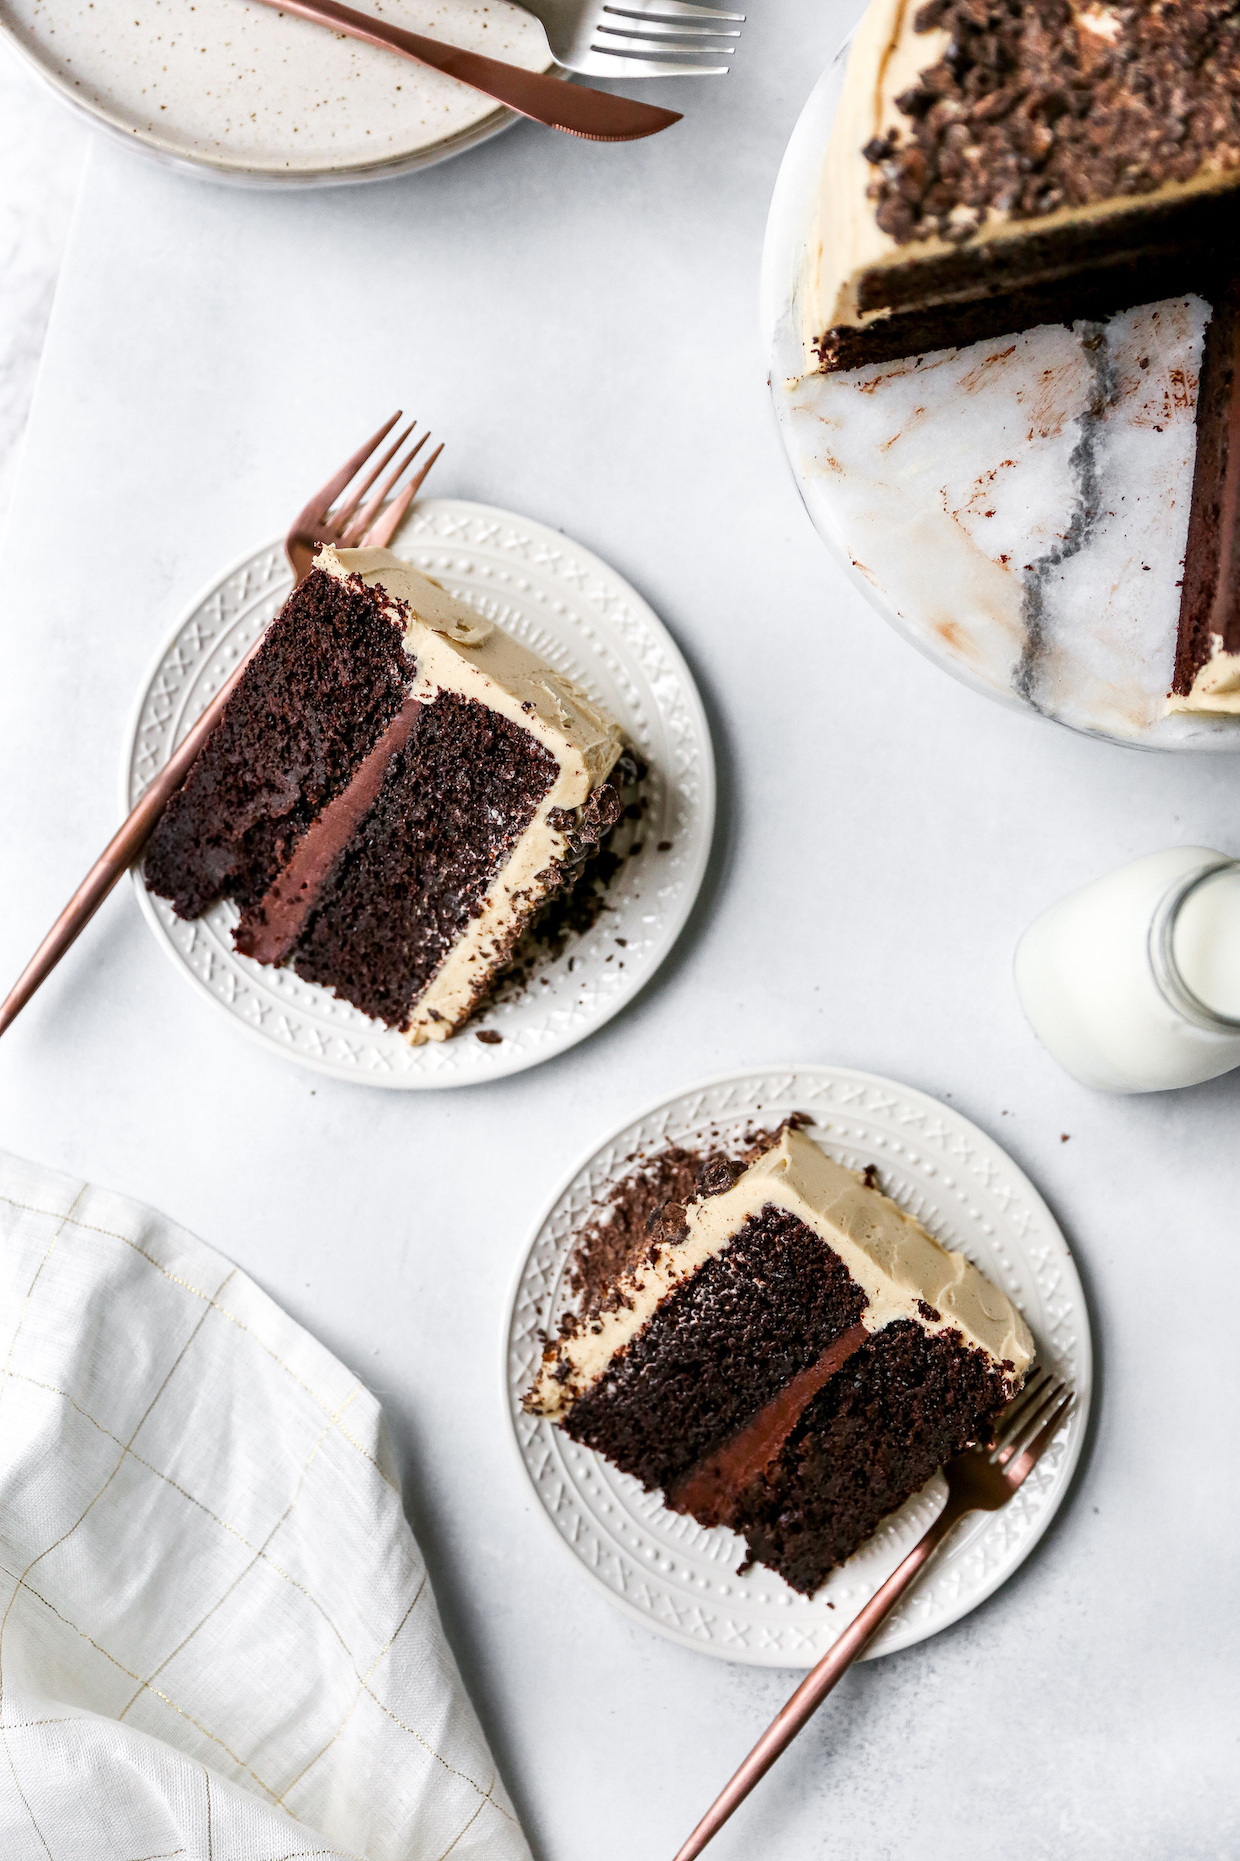
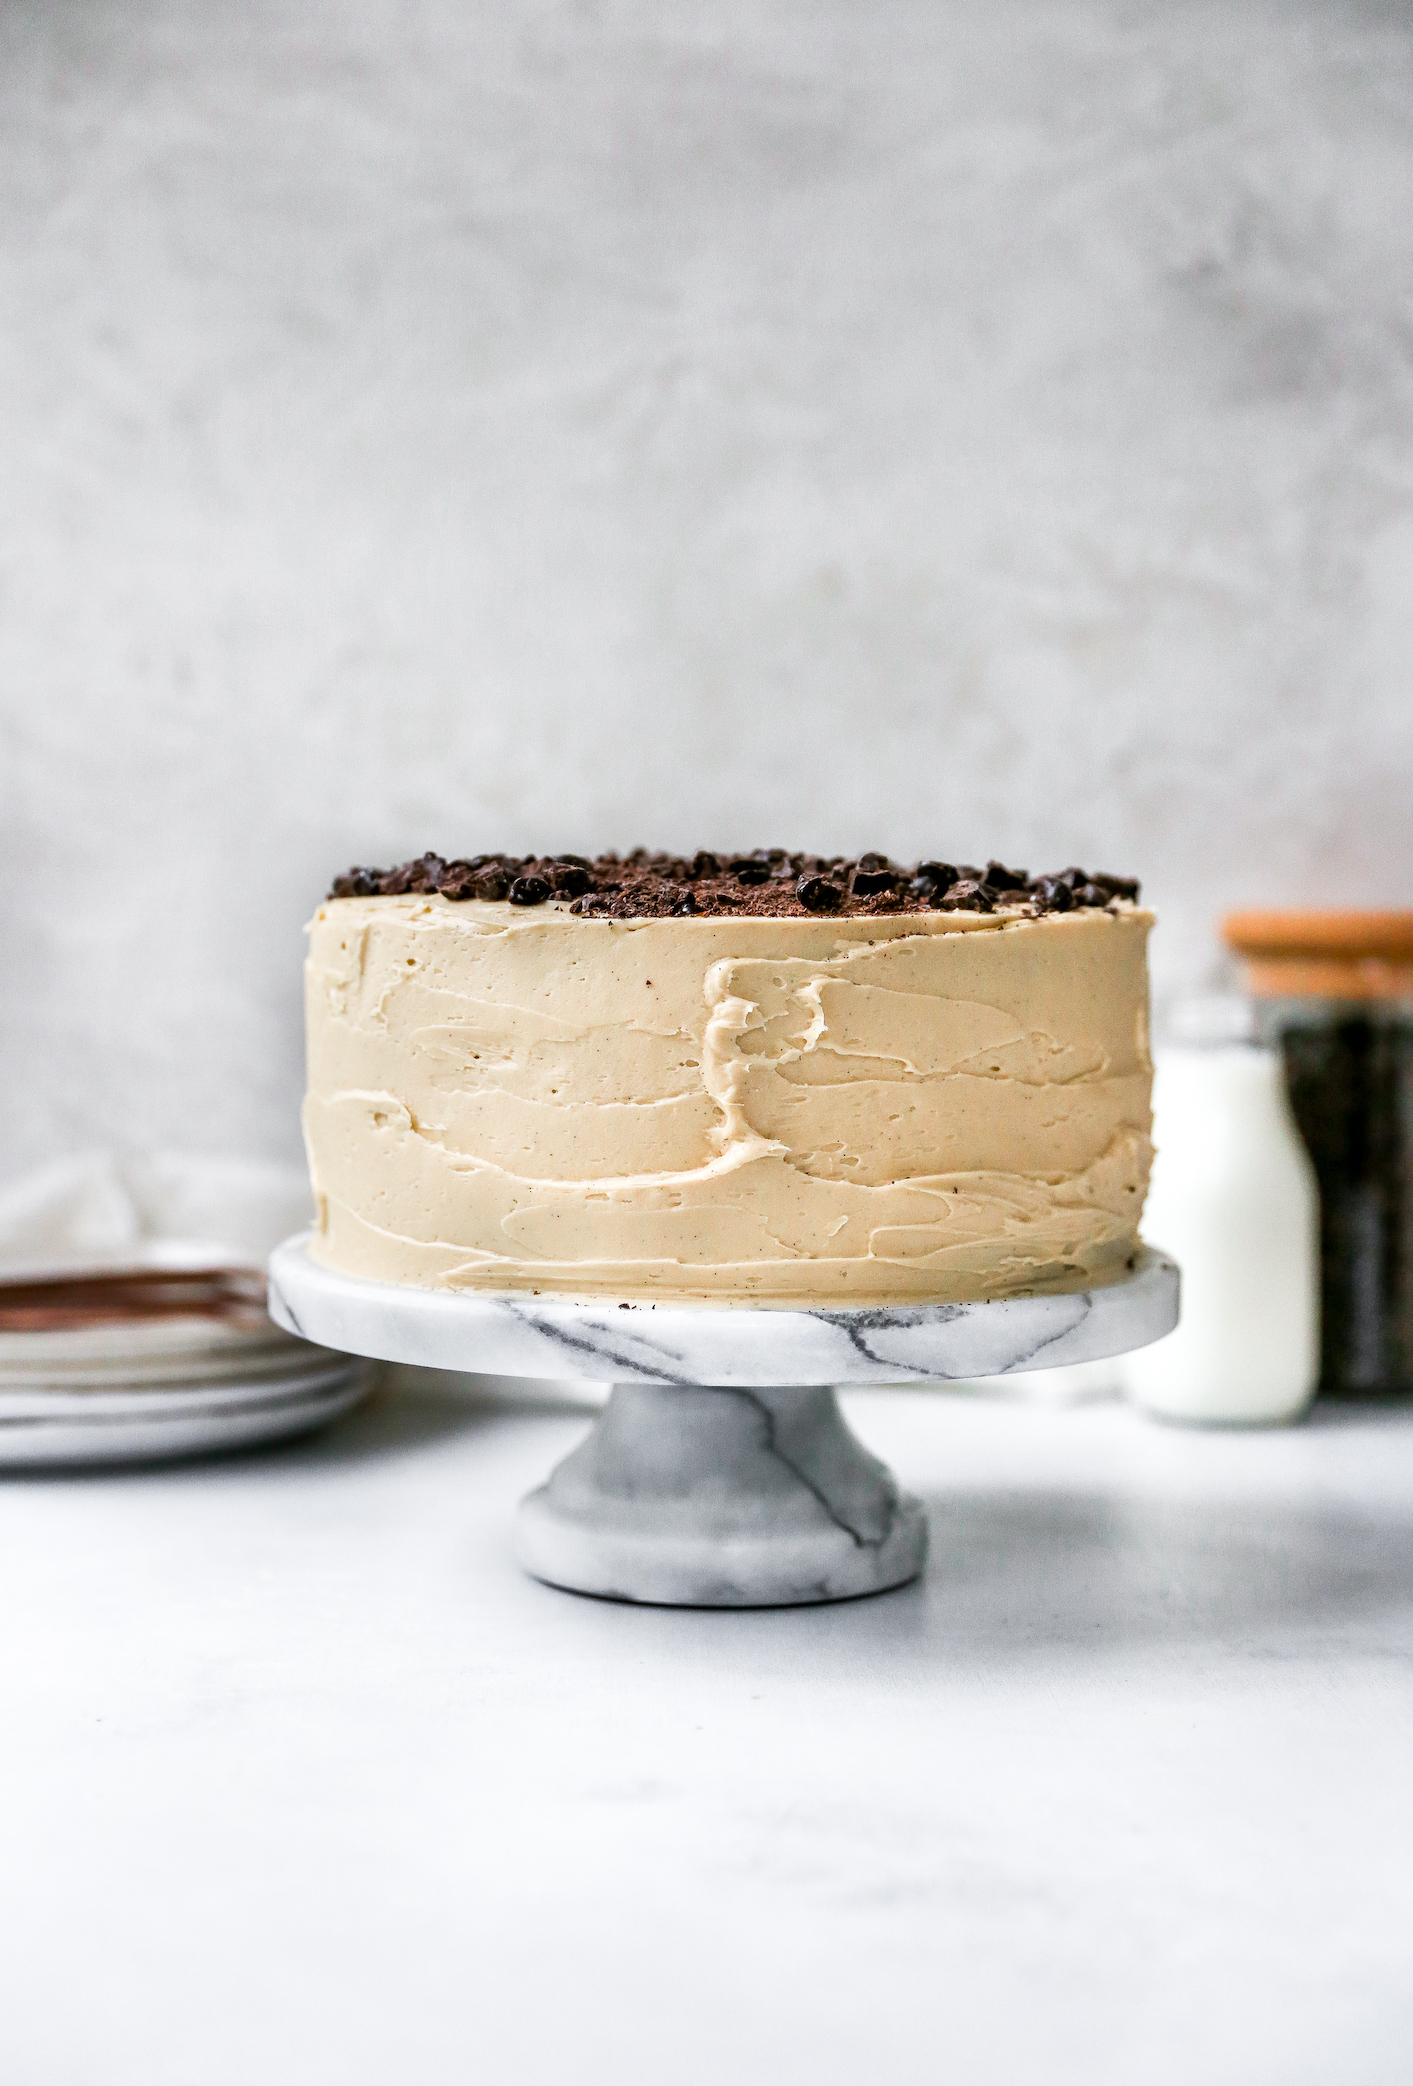
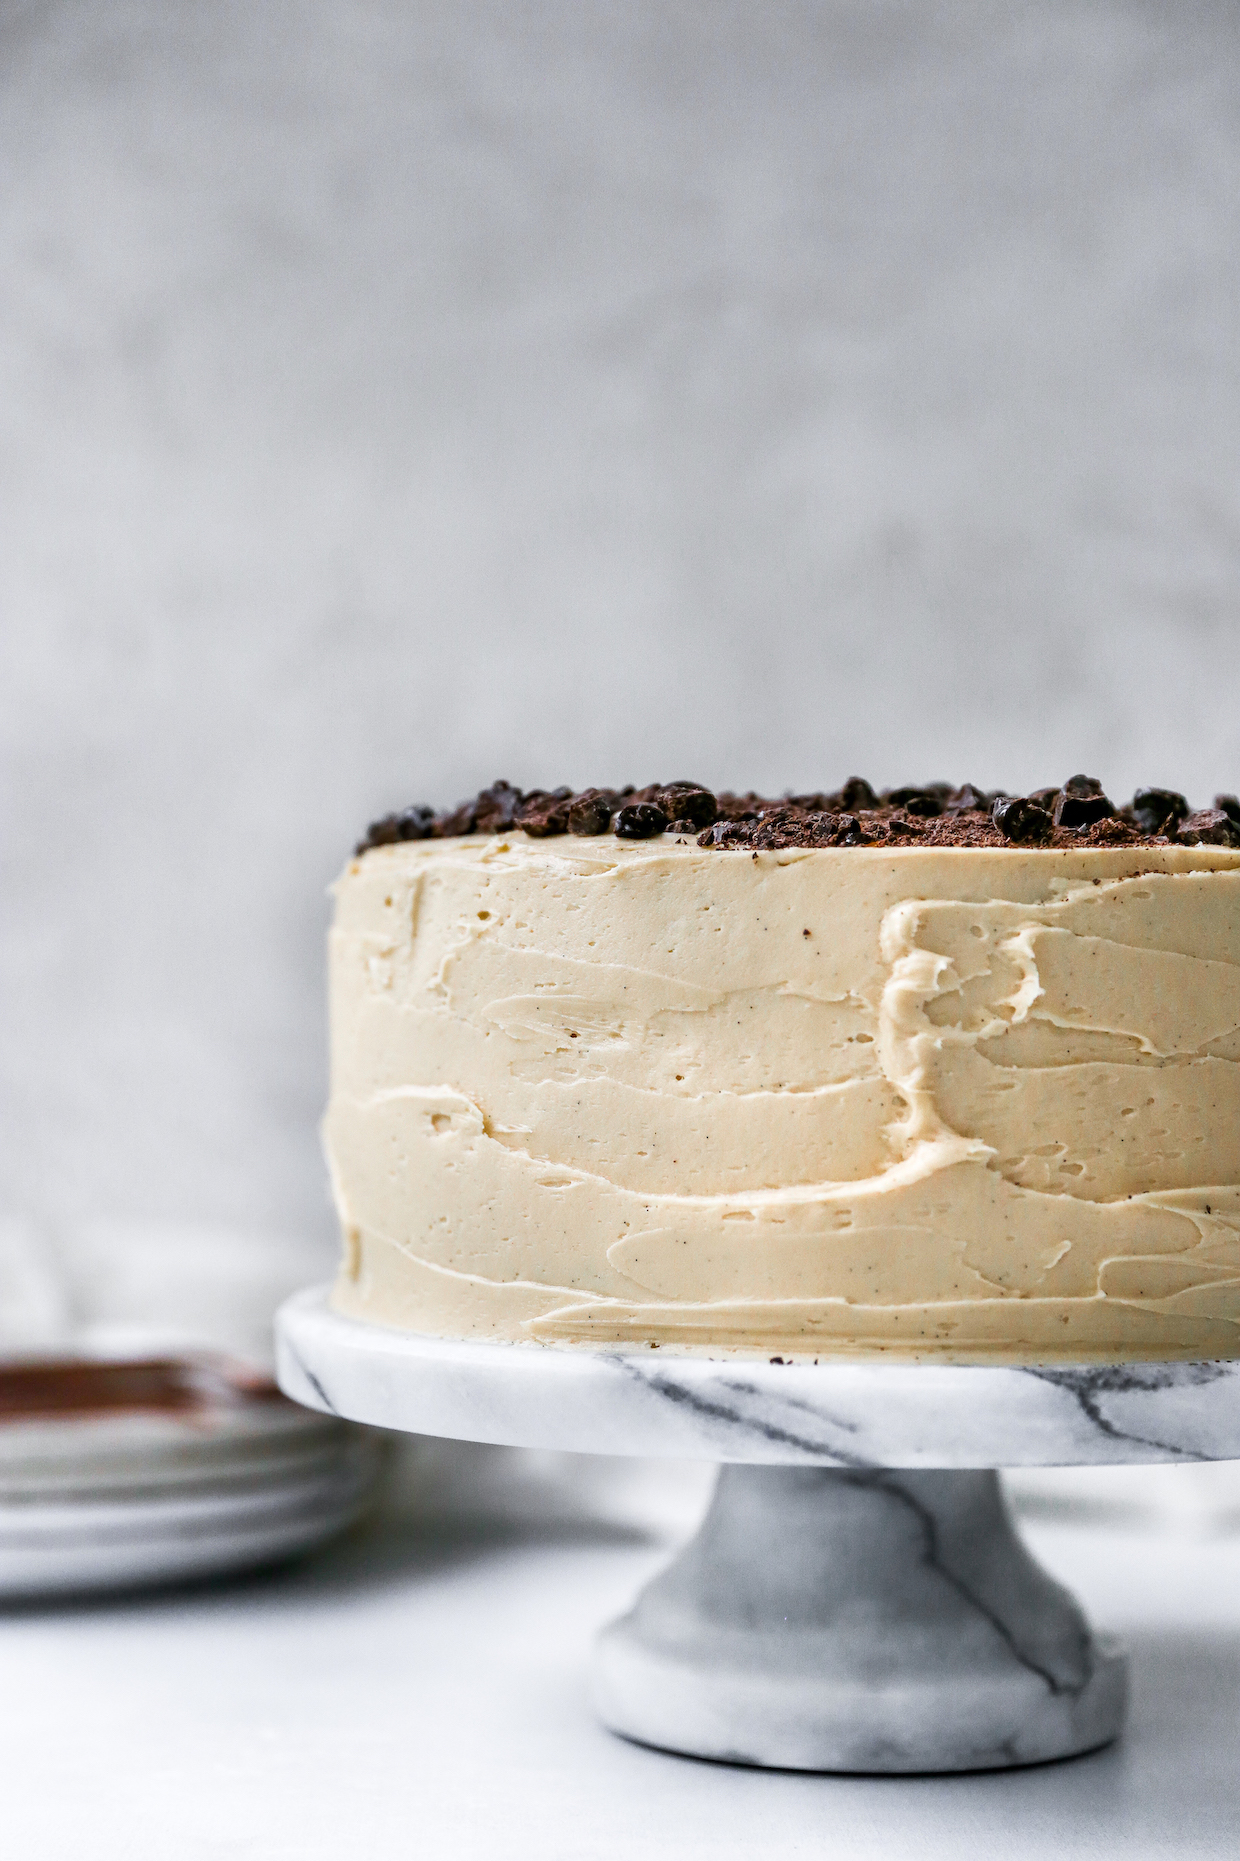
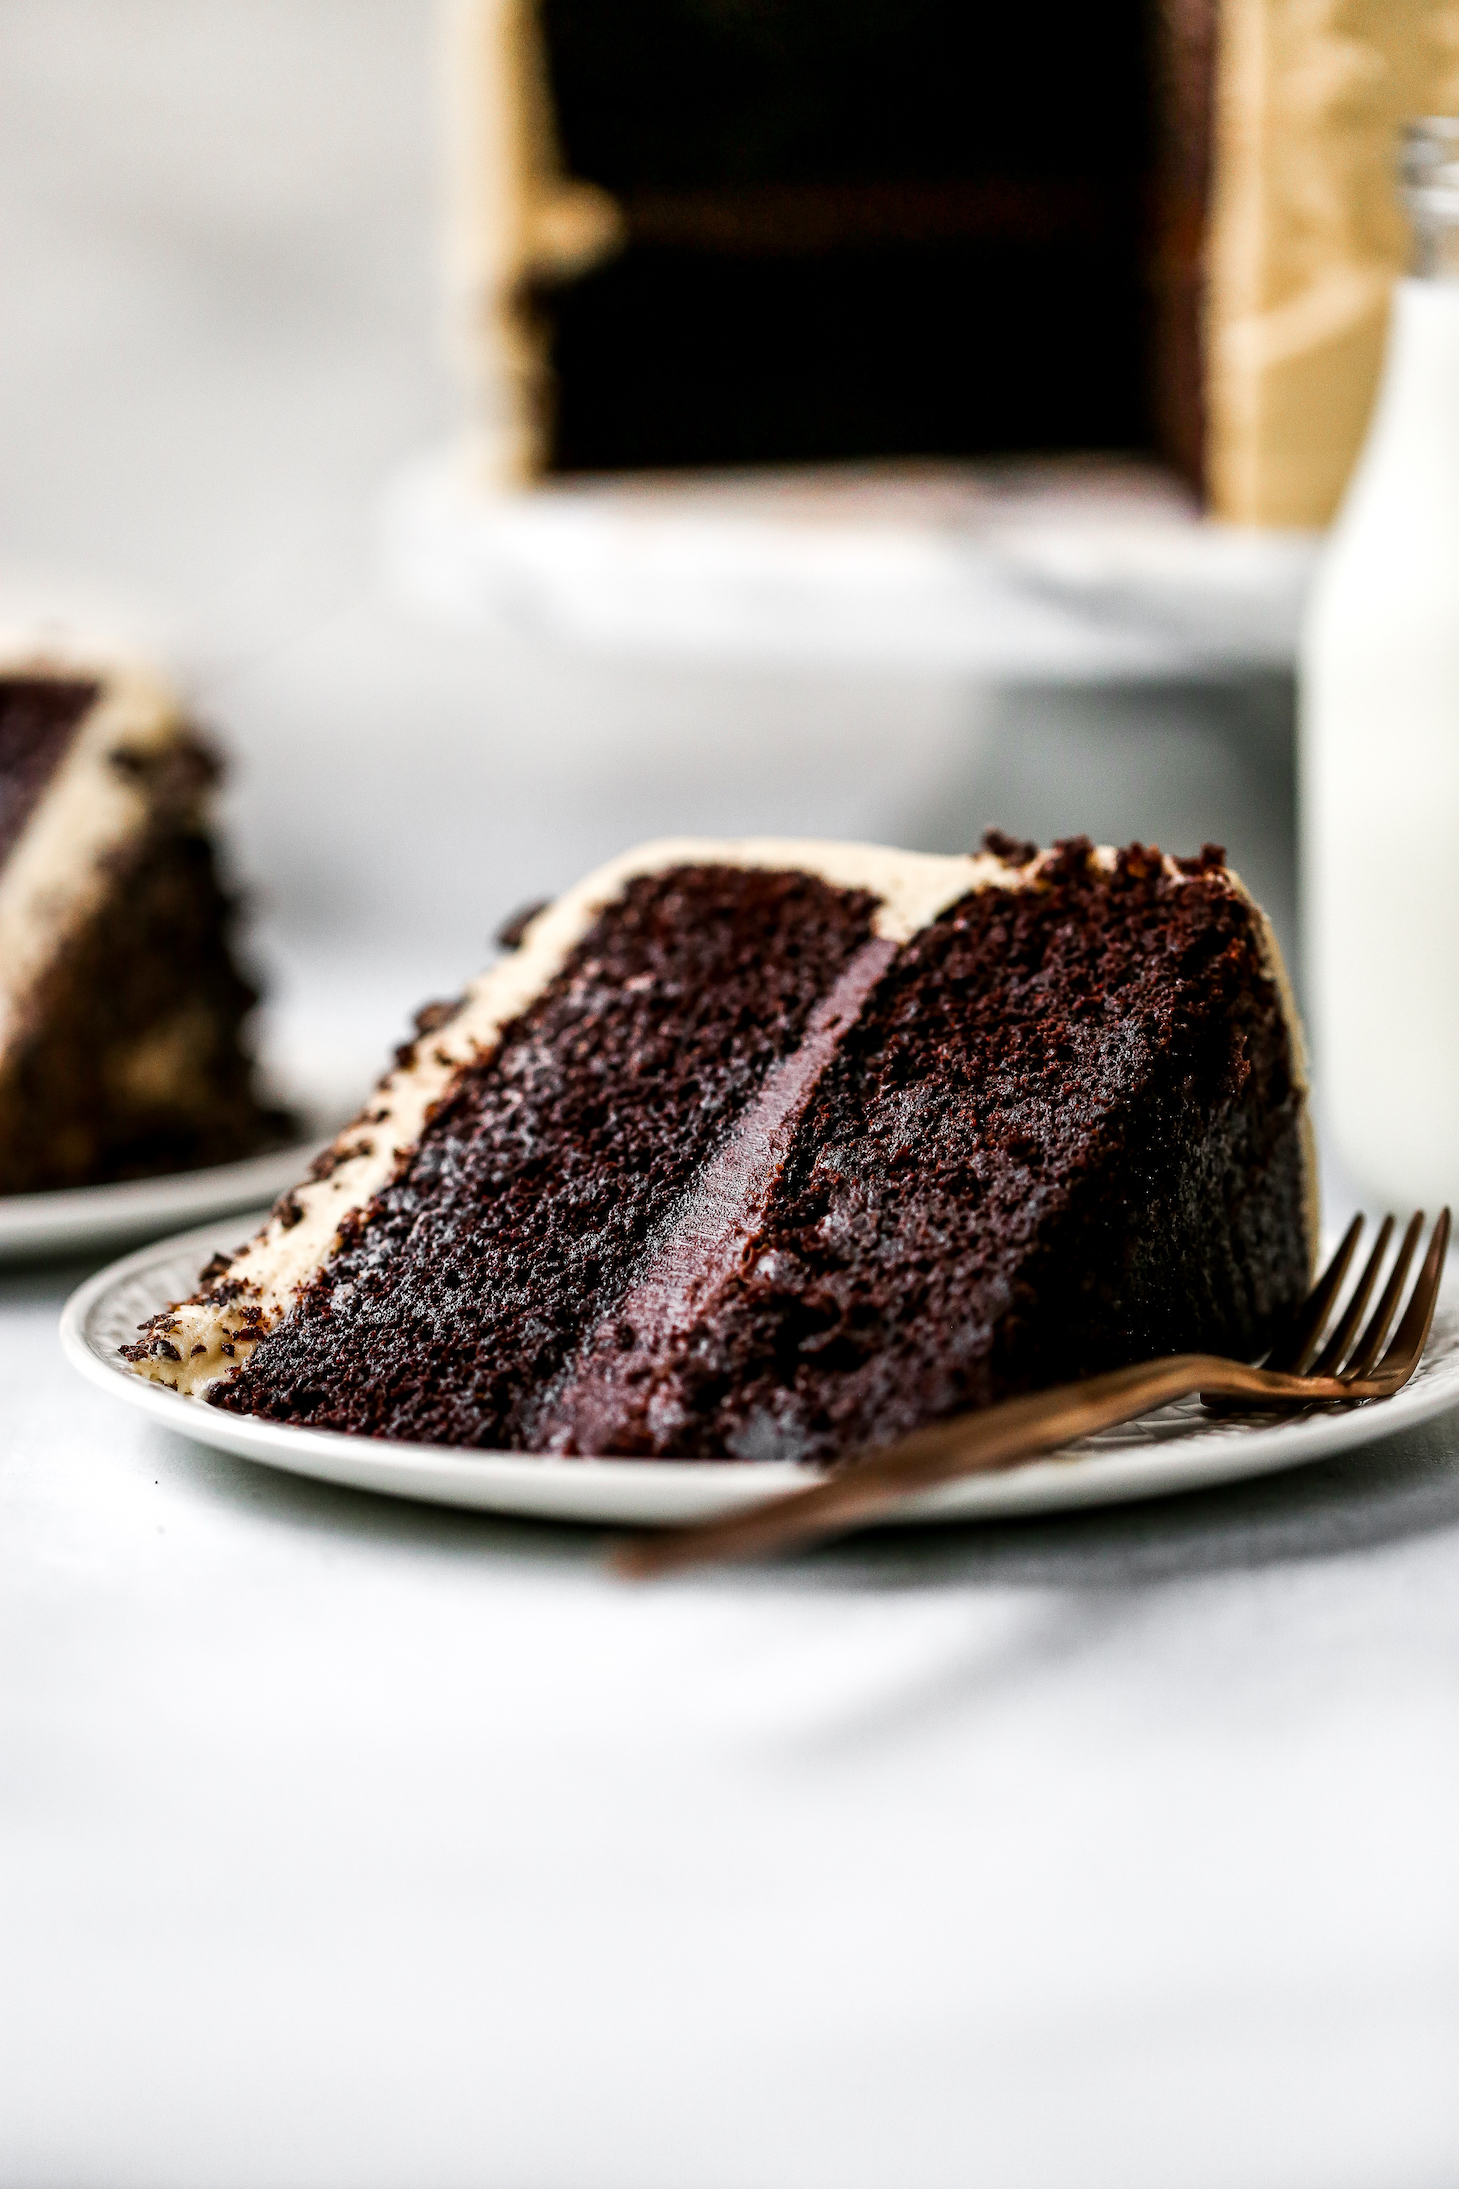
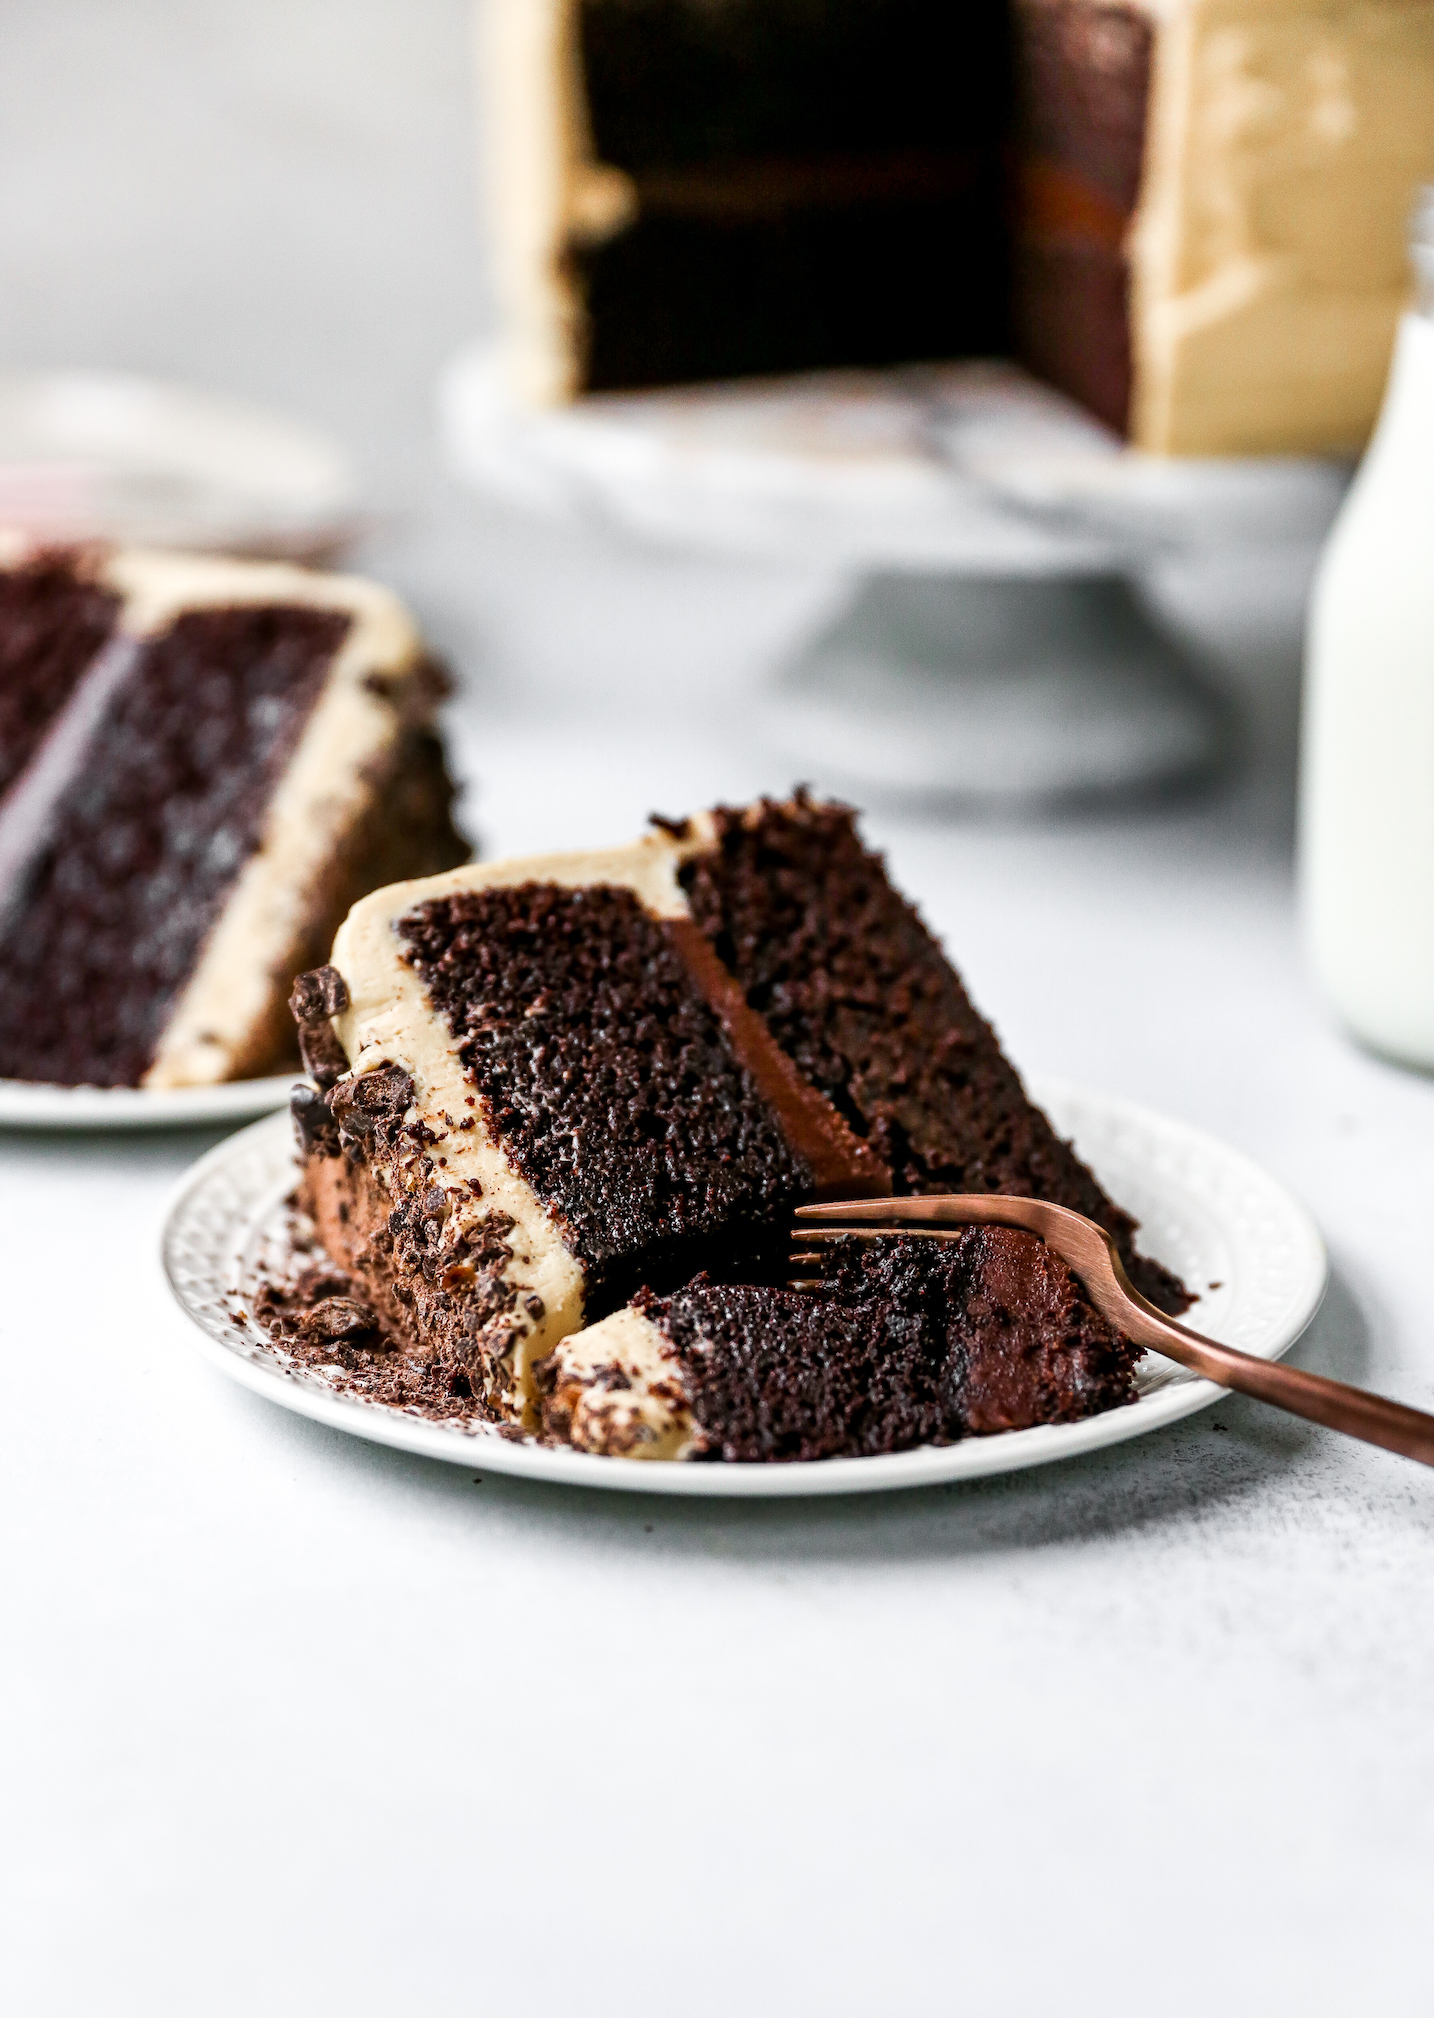
Enter mocha. Coffee + chocolate = perfection. I went with that notion for all components of this layer cake. Everything from the cake batter itself to the frosting to the filling are focused on the torrid love affair I have with the coffee and chocolate combination. The result is sinfully delicious. I ADORE this cake.
Hence, it seemed most appropriate to share this particular recipe with you on the blog’s first birthday. Cakes are for birthdays, after all. And this one rocks.
Happy Birthday, Blog! Here’s to many more (cakes!)…
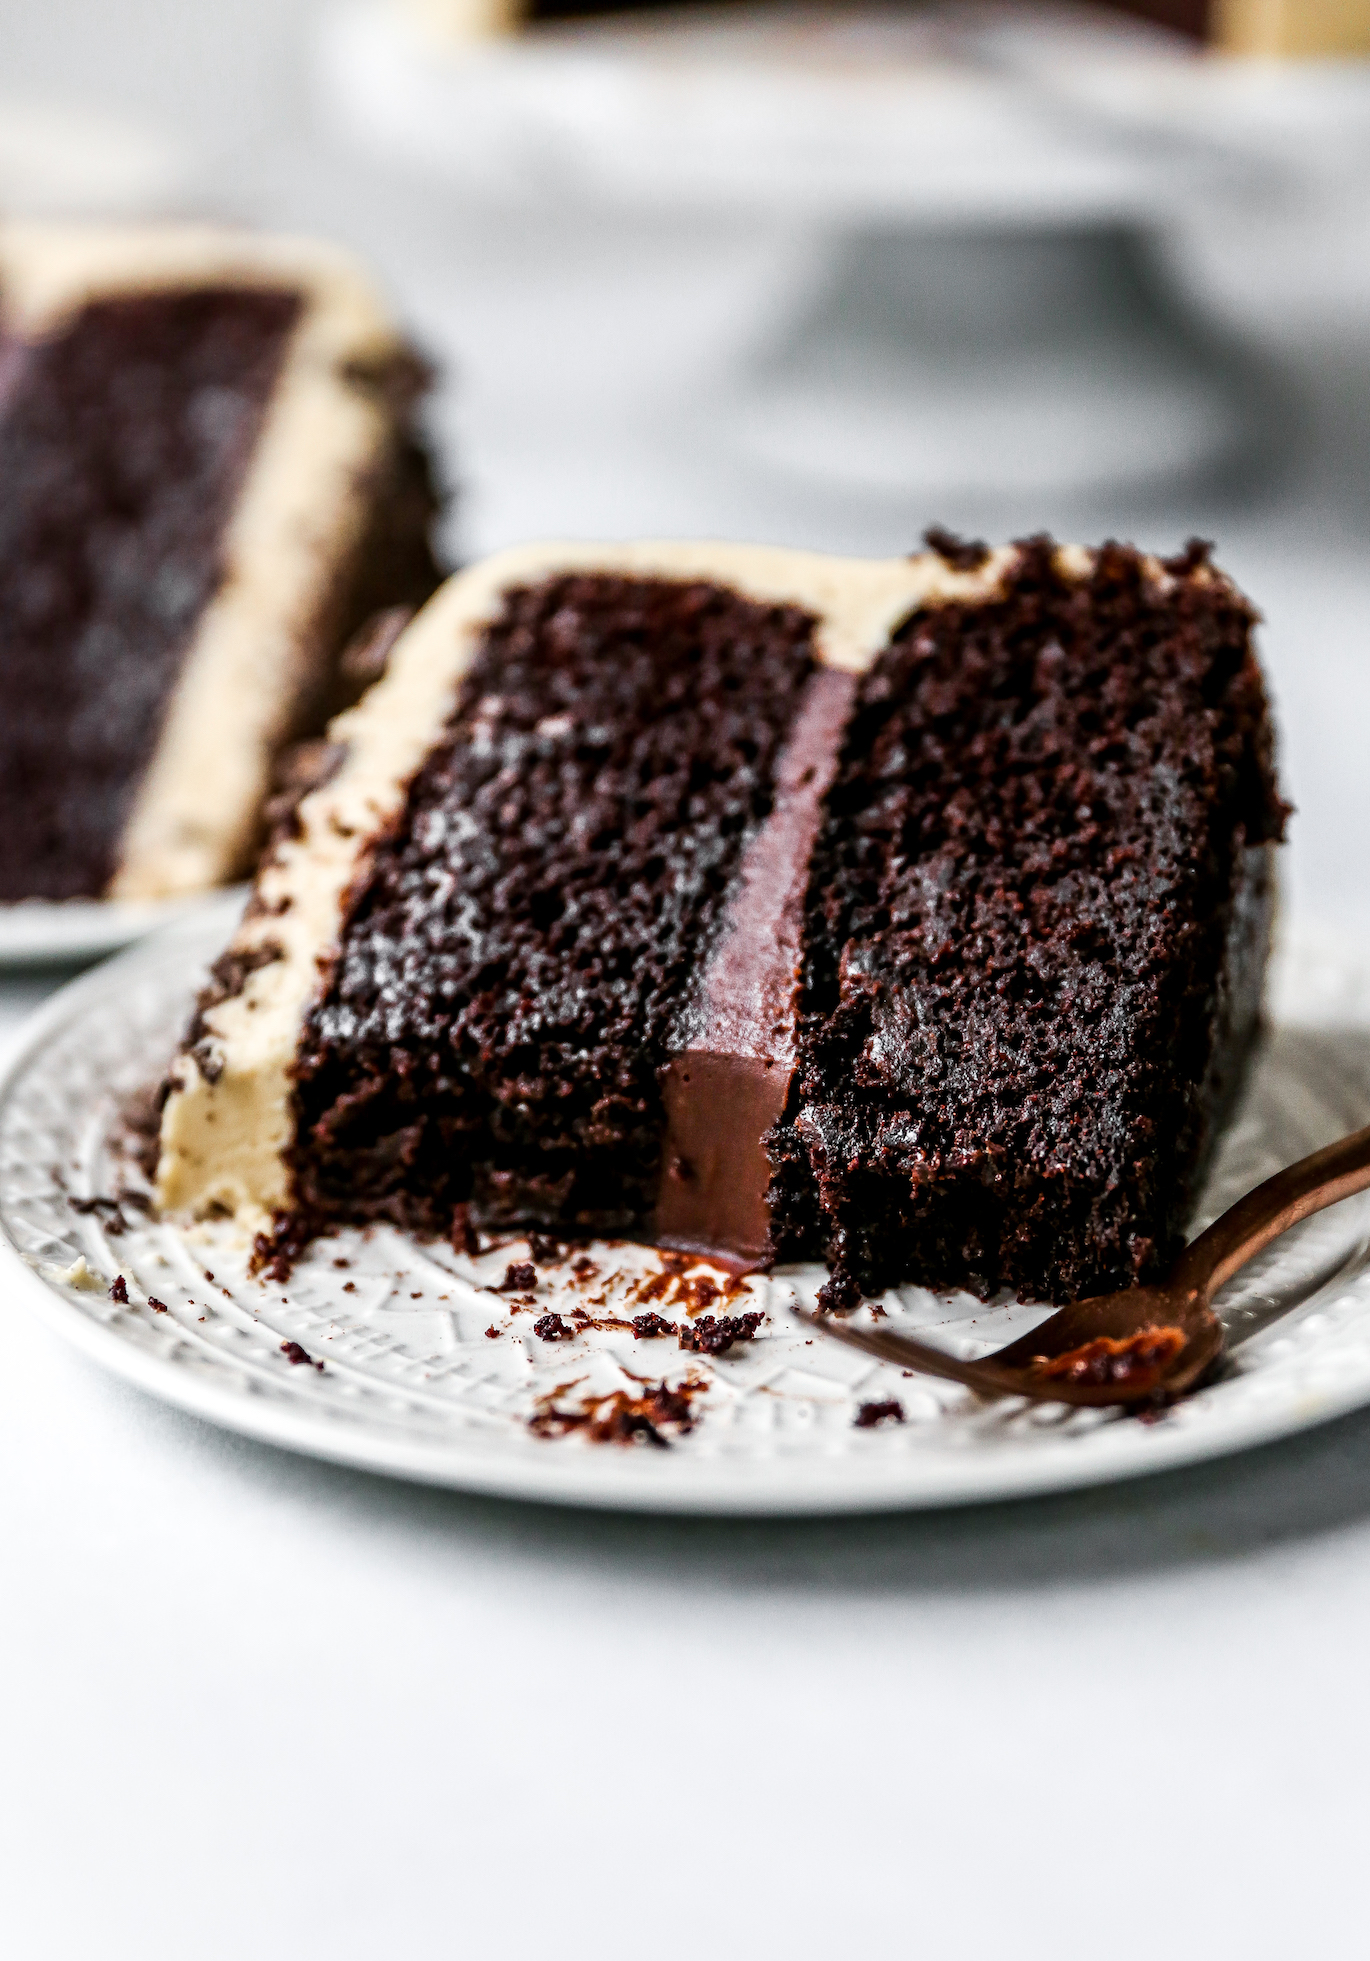
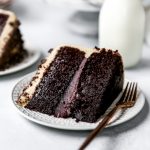
Mocha Cake with Fudge Filling & Espresso Frosting
- Total Time: 2 hours
- Yield: 10-12 servings 1x
Ingredients
For the Cake:
- A couple tablespoons of softened butter, for greasing the cake pans
- 3 oz semisweet chocolate chips
- 1½ cups hot brewed coffee
- 3 cups sugar
- 2½ cups all-purpose flour
- 1½ cups unsweetened cocoa powder
- 2 teaspoons baking soda
- ¾ teaspoon baking powder
- 1¼ teaspoons fine salt
- 3 large eggs
- ¾ cup canola oil
- 1½ cups buttermilk
- 1 teaspoon vanilla
For the Filling:
- 8 oz semisweet chocolate chips
- ½ cup heavy cream
- 1 tablespoon sugar
- 1 tablespoon instant espresso powder (or instant coffee powder)
- 1 tablespoon light corn syrup
- Pinch of fine salt
- 2 tablespoons unsalted butter
For the Frosting:
- 1 (8-oz) package cream cheese, softened
- 1 stick unsalted butter, softened
- Pinch of fine salt
- 6 cups powdered sugar
- 2 tablespoons instant espresso powder (or instant coffee powder)
- 1 tablespoon vanilla extract
Finely chopped chocolate-covered espresso beans, for garnish
Instructions
For the Cake:
- Preheat oven to 300°F and liberally butter two 9-inch round pans (See important NOTE below).
- Place the chocolate chips in a small bowl and pour the hot coffee over top. Let mixture stand, stirring occasionally, until chocolate is melted and the mixture is smooth.
- Into a large bowl, whisk together sugar, flour, cocoa powder, baking soda, baking powder, and salt.
- In the bowl of a stand mixer, beat the eggs until lightened in color and slightly frothy, about 2 minutes.
- In a large measuring cup, stir together the oil, buttermilk, and vanilla.
- Slowly add the buttermilk mixture to the eggs, mixing until well combined. Do the same with the chocolate-coffee mixture.
- Add the dry ingredients to the wet mixture in two or three batches, mixing until just combined. Resist the urge to overmix the batter. You want to mix until all the dry ingredients are visibly incorporated.
- Place the cake pans on a large baking sheet. Divide the batter between the prepared pans and bake in the middle of the oven until a tester inserted in the centers comes out clean, roughly 60-75 minutes (check after an hour).
- Cool the cakes in the pans for 15 minutes and then carefully invert them onto cooling racks to finish cooling.
- Cake layers may be made a day or two ahead and kept, wrapped well in plastic wrap, in the fridge. I actually prefer to do the cakes ahead because they are easier to frost if chilled.
For the Filling:
- In a saucepan, bring cream, sugar, espresso powder, salt, and corn syrup to a simmer over moderately low heat, whisking until sugar is dissolved.
- Remove pan from heat and add chocolate, whisking until chocolate is melted. Cut butter into pieces and add, whisking until smooth.
- Transfer the mixture to a bowl and cool, stirring occasionally, until spreadable. This should take 20-30 minutes. You want it to be of a fudgy consistency so that it does not run out the sides of the cake during assembly. I let it cool until it is a similar consistency to frosting.
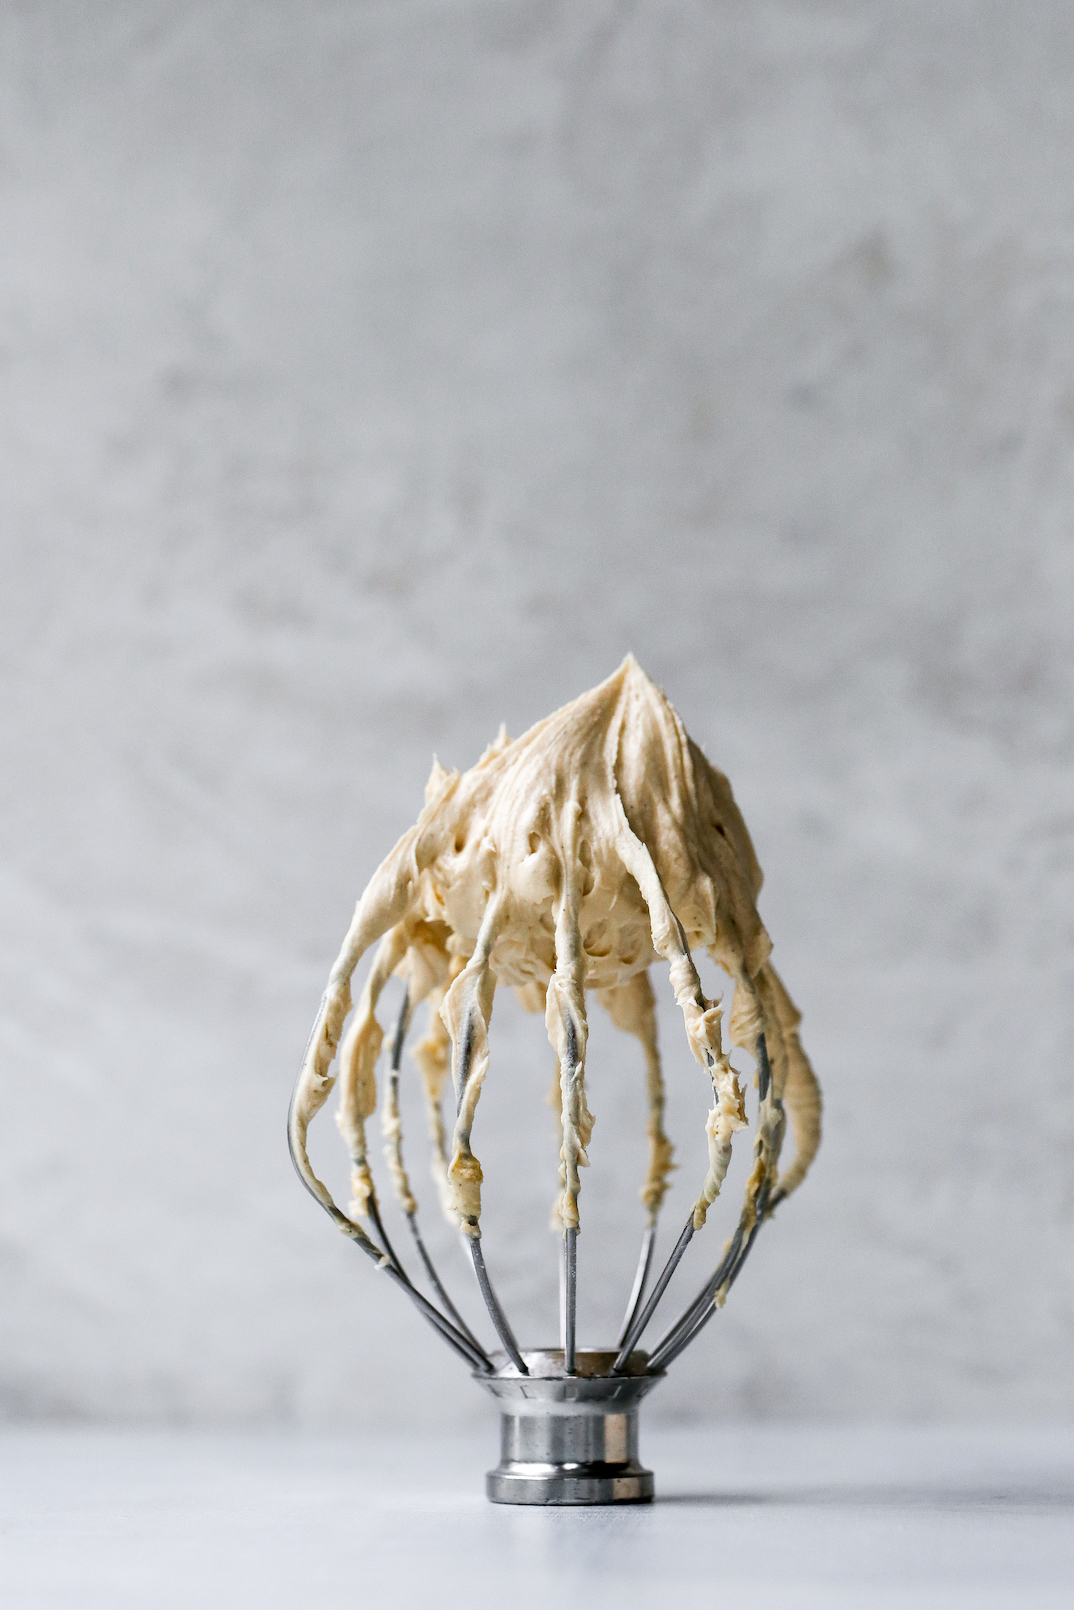
For the Frosting:
- In the bowl of a stand mixer, cream together the cream cheese and butter with the whisk attachment for 2 minutes, or until they are fluffy, creamy, and well combined.
- Add in the salt and half the powdered sugar and whisk on LOW to combine.
- Meanwhile, dissolve the espresso powder in the vanilla extract and then add it to the frosting, mixing to combine.
- Add more powdered sugar as needed to reach a thick and creamy consistency (for me, this is usually 5 cups of powdered sugar, but depending on the moisture of your ingredients, you may need a little more).
To Assemble:
- Place the first cake layer on a cake pedestal (or plate). Spread the cooled fudge filling mixture on top of the first layer. Do not go all the way to the edge. Top with the second cake layer.
- Dollop half of the espresso frosting on top of the cake and work it around the top and down the sides, swirling the frosting evenly as you go. This will serve as a “crumb coat.” Place the cake in the fridge for 20-30 minutes so the first layer of frosting can set.
- Spread the second layer of frosting over top of the first (this will cover up any cake crumbs that have worked their way into the first layer of frosting), smoothing everything out as you go. Garnish the cake with finely chopped chocolate-covered espresso beans (an optional step!).
- Slice and serve! Store any leftover cake well wrapped in the fridge and allow enough time to let it come back to room temperature before serving again (See NOTE below).
Notes
- I have always made this cake using two 9-inch cake pans without any issue, but several readers have commented that this yielded way too much batter for them to fill only two 9-inch pans. I am unsure why this recipe has worked perfectly for some (myself included! I’ve made this cake at least 10 times without issue) and has been a disaster for others. These are the exact cake pans I use (they are the BEST). Dividing the batter between two of these pans has never caused me any problems – the batter recipe fills them two-thirds full, and during the baking process, they always bake right up to the top of the pans without overflow. If you have cake pans with lower sides, I highly recommend baking this in three cake pans and assembling the cake as a three-layer cake. I also recommend baking with the pans set on a baking sheet so that if there is overflow, it goes on the baking sheet and not your oven.
- Baking this cake at a lower temperature (300°F) yields a fudgy, very moist cake. I recommend baking at this lower temperature and adding more time, as needed, to get the cakes cooked through. The longest I’ve had to bake these cakes is for 1 hour and 15 minutes.
- Because this recipe has a higher wet-to-dry ingredient ratio, the resulting cake is a bit crumbly and extremely fudgy and moist. I highly recommend that you frost the cakes after they have been chilled in the fridge – this makes it much easier! Not only will the cakes hold together better in general, but you also will have fewer crumbs getting into your frosting.
- MY TIMELINE: My plan of attack is usually to bake the cakes the day before I want to serve them, let them cool completely, wrap them well in plastic wrap, and keep them in the fridge until I’m ready to assemble. I make the filling and the frosting on the day that I want to serve and then assemble while the cakes are still chilled. Once the cake is frosted, I recommend keeping it in the fridge. Take it out roughly 30 minutes before you want to serve it so it isn’t ice cold.
- Cake lightly adapted from this recipe.
- Cook Time: 2 hours
- Category: dessert
Keywords: mocha cake recipe, chocolate mocha, espresso buttercream recipe, chocolate mocha cake, layer cake recipes
Ohhh my goodness that cake looks deliciously moist and amazing!! The filling in between layers looks simply divine. Happy first blog birthday – looking forward to what you come up with in years to come! 🙂
Thank you! 🙂
Happy blogiversary! And I think all of your photos are amazing!
Thank you so much!
I made this cake today for my boyfriends birthday and just ate a piece! It was so yummy…the frosting is by far my favorite part. The coffee flavor is the perfect amount, not too overpowering. My only problem was that a lot of my fudge leaked out when I put the top layer on. It wasn’t a nice thick layer like yours was (maybe didn’t cool enough). Still yummy!! 🙂 Thank you for the recipe!
Make this cake but for the love of God, use 3 pans… This was an absolute fail the first time around. As others mentioned (and I failed to heed the advice) this batter should be for 3 pans. I know the author insists that it can fit in 2, but you would literally need bundt pan sized walls for that and I dont know any cake pans like that…
Anyway, after having to throw out the entire first batch after they bubbled over all over my oven, I still tried again. I divided the batter into 3 pans and STILL had about 1.5 cups of batter left over. Had I used all of it, they would all 3 have bubbled over again… way too much batter. Seriously, don’t try to do it in 2. Just do 3 (minimum) and save yourself a huge mess.
I also buttered the pans, lined them with parchment on the bottom, buttered the parchment, then also floured them. This helped turn them out WAY easier. The first batch I did I was scraping the cake out of the pans and couldn’t get it out (such a disaster). 2nd run through went way better with these modifications.
The frosting is absolutely stellar. Plenty to go around the 3 layers I made this into and plenty of the chocolate fudge part to make 2 layers of that as well and just use 1/2 for each layer.
Just ate the first slice and it was divine. Fantastic combo of flavors. Definitely make this cake, but make it a 3 layer cake!! So good!
★★★
If you review my recipe notes, I actually DO recommend using three cake pans. I have used two with success but my cake pans are deep. The recipe notes indicate that three pans is likely ideal for most people.
Hi! Same as above really! I made this cake yesterday for my boyfriend’s birthday. I’ve just eaten a slice and it was amazing!! I had to do a bit of tweeking as I’m currently in Barcelona and some ingredients are not available here – like buttermilk (used 1 individual pot of natural yoghurt + 3/4 cup of milk to substitute), unsweetened cocoa (used a chocolate powder for making churros dipping sauce), corn syrup (mixed 2tsp of cornflour with 2tsp boiling water to make paste), soft cheese (found some mascapone here – delicious!)
I also ran out of chocolate chips when making the fudgy filling (used about 1/2 the given amount), but now it has a really bitter sweet coffee taste. I love this cake! It’s amazing and thank you for sharing 🙂
So glad you enjoyed it! It’s one of our favs! 🙂
Is it ok to use vegetable oil in place of canola oil in this cake?
Yes!
I followed the recipe word for word but it came out an absolute failure. As soon as I mixed up the batter I had a bad feeling about it because it was so thin. I also had plenty of batter left over after filling two cake pans. The temperature also seemed very low- I’ve never baked a cake at 300 degrees. I left the cake in for well over 75 mins and even tried turning up the temperature. In the end I had to toss it out, there was no way to salvage it. Not sure what went wrong- the liquid to dry ratio seemed off. Unfortunate because I was really looking forward to trying this cake
Sophie, I’m so sorry to hear this! I’m really not sure what went wrong, as I’ve been making this cake for years now using the exact recipe above. It seems to have worked well for a few other people as well. Regardless, I’m totally bummed to hear that this didn’t work out for you. I wish I knew what went wrong! 🙁
I wonder if maybe you made a dam with the butercream before you pour in the fudgy middle. I plan on making this cake for my daughters 16th birthday. I will try to come back with insights and results.
I made this cake for my husband’s birthday and it was TO DIE FOR! So glad that the frosting could cover my mistakes from a cake that got stuck to the pan! My favorite part is the frosting. YUM! I brought it to work the next day and got SO many compliments! Thank you for a wonderful recipe!
I am SO happy to hear that you loved the cake! It is one of our absolute favorite! People request it again and again. Thanks for the comment! 🙂
What do you recommend for substitutions if I don’t want to use the brewed Coffee and Espresso? I don’t care for coffee and Espresso flavors but this cake and filling looks so yummy!
Thanks!.
Hi Debbie. Hmm, I’m really not sure. You may be able to sub the coffee out with another liquid such as milk, but baking is so precise and I’ve never tried that, so I can’t guarantee that it will come out. The espresso powder is much easier to omit. Just as an FYI: the liquid coffee in the cake won’t come through super strong. It really just enhances the chocolate flavor. It won’t taste like a cup of coffee! The espresso powder is what gives each of the components the mocha kick. Perhaps you should try making the cake as is but without the espresso powder? It really shouldn’t taste too strongly of coffee. I hope this helps!
Just made this cake and followed the recipe exactly. The cake came out great! I didn’t have any issue with too much batter or the pans overflowing. I baked the cakes for 60 minutes at 300 and they were perfectly done. Would definitely make again!
★★★★★
I made this cake last weekend for my dad’s birthday dinner and while it tastes really good, the cake batter requires more than 2 9-inch pans. I knew when I was pouring it into the 2 pans that there was way more batter than the 2 pans would hold. I would recommend changing the directions to 3 layer/pans.
Thanks for the suggestion, Misty. I’m sorry to hear that this didn’t quite work out for you. I’ve always made this using two cake pans and have never had an issue. Regardless, I hate that it wasn’t successful on your end. So sorry!
Baked this today for a friend’s birthday by request.
And she and the whole gang at work loved it. Very rich cake!
So thrilled to hear this! Thanks, Kalli!
This recipe is not great. The frostings are awesome but it’s clearly based off of this recipe: http://thestayathomechef.com/the-most-amazing-chocolate-cake/
Which spreads the batter across THREE 9 inch pans – which this should really call for… I had a major overflow in just two 9 inch pans, way too much batter. What a mess.
Hi Jenny. I’m so bummed to hear this! No part of this recipe was based off the recipe you linked to – if it was, I would have linked it initially (side note: it’s not OK to accuse someone of stealing another author’s recipe without giving credit, by the way. The frosting recipe is 100% my own). I’ve made this cake several times in two cake pans without trouble, but you are not the only commenter to experience this problem. A couple others have suggested making this in three pans, instead of two. I am not an expert baker by any means, so I can’t really help with explaining why this worked perfectly for some people and was a disaster for others. Regardless, I’m very sorry to hear that this one didn’t work for you.
This cake was absolutely delicious. I made mine in 2 x 8 inch pans with higher sides and it was perfect. I had a good high 8 inch cake. What i would like to know is if you have tried this as a cupcake recipe?
Thanks once again
Tania
So glad to hear, Tania! I have not tried this as a cupcake recipe yet – if I do, I’ll be sure to let you know how it turns out! 🙂
Omg I just have to tell you thank you for sharing this amazing recipe! I’m making this for my boss’s birthday tomorrow!!! I can’t wait for everyone to try it!!! Thank you again!! Just waiting to put the second coat of frosting on and garnish!! This will be my go to recipe from now on!!
Thank you so much, Cristina! I hope you and your coworkers enjoyed it! This is one of our favorite recipes. 🙂
Hi! I’m planning on making this cake in the next couple days. Will the fudge filling be ok in the cake if the cake is out in room temperature for 3 days?
Thanks!!
It should be fine! Hope you enjoy it!
Hi I’m just wondering how many cups the chocolate fudge filling yields? I would like to make a tiered cakes with this recipe but not sure how many batches of fudge filling this makes. Thank you in advance!
Hi Corinne! It makes roughly 1.5 cups!
Hi Molly – this recipe is the same as Double Chcoolate Layer Cake from Epicurious – I have the original recipe but the frosting is different .It is best made in three 9 inch pans for the best results .Thank you .
Thank you so much for this! I have not been able to find the recipe I originally based this off of for YEARS. I’ll add it to the recipe notes so people are aware! I very much appreciate this. Thanks!
Hi Molly – you are very welcome! Thank you so much for your prompt reply ! Love your blog and your recipes . All the very best !
Thank you for this recipe! I made it for my mom’s birthday and everyone loved it. Super moist cake, delicious fudge filling, and a perfect balance of coffee flavor in the frosting. I followed the recipe exactly and cooked the cakes for 60 minutes, turned out just like the pictures. The only weird thing: even though I used two 9 inch pans, I did have extra batter like some others on here, enough to make about 8 cupcakes. Which turned out great for my coffee-hating husband, because he was able to eat a couple un-frosted.
★★★★★
I’m so glad to hear you enjoyed it! It’s our favorite!
I really loved your post. I read your blog quite often and I just shared it on Pinterest.
Keep up the good work.
★★★★★
Divinely distinctive and delicious adding a satisfying finish.
★★★★★
This cake is amazing!!
★★★★★
It did indeed make a lot of batter. I got 2 9in layers plus like 15 cupcakes but my kids loved the cupcakes plain. So win win!
Hi,
I made the cake today using 2- 9 in cake pans specifically the WIlliams Sonoma goldtone nonstick ones. The batter fit perfectly in two pans.
Re: the frosting recipe. Is this cake still tasty with just half the frosting? I find a lot of recipes sometimes call for too much frosting.
Found this beautiful cake on Pinterest and it led me to your equally beautiful blog!!
★★★★★
Aw, thank you, Sarah!
Hey Molly! This cake looks absolutely delicious, but it didn’t turn out right for me.
The cake layers after baking were very dense and didn’t rise, and then top of it was smooth and matte, it reminded me of playdough.
Do you have any tips to fix where I went wrong?
Do you think I can make the filling ahead of time? I was worried it might cool too much and be too thick? Just trying to be super efficient.
The past two years I’ve made components of this cake (last year, the espresso frosting and fudge filling; this year, the chocolate cake) and everything has been a huge hit :)!!! I baked the cakes in eight inch pans for around 55 minutes and they turned out so delicious and fudgy (I honestly probs could’ve gotten away with 50ish minutes for extra fudgy cake). Thanks for the recipe!!!
★★★★★
I made this today and each component was delicious by itself so I am super excited to have everything together. Easy recipe to follow and put together it looks amazing! I had enough batter to make three layers in my 8-inch round pans so just made a little extra frosting and there you go.
★★★★★
Hi! What can I use instead of corn syrup for the filling?
Cant wait to bake this!
You can use honey. I haven’t done this myself, but I’ve subbed it for corn syrup in other recipes, and it should work here! The taste of the filling will be a little different, but texturally, it should be about the same.
I made this over the weekend I had to make it twice because it was just way too much batter. So I had to make a three layer cake, I doubled the icing (only because I decorate my cakes) and it turned out really well. In fact I did a 1/2 cup of black cocoa and 2 cups of regular cocoa for the color and everyone loved it! I would just make this a three layer cake with 9 inch pans instead of a two layer.
Thanks for sharing this amazing article, it is a very informative post good work keep it up
Hi! I’m really excited to try out this recipe! But could you make it with gluten free flour?
Hi Sherrey. Unfortunately, I haven’t tested this recipe with gluten-free flour, so I’m not sure. If you try it out, please report back!
Hi! Coming back on here after I made this cake! I made it gluten free using Bob’s Red Mill 1 to 1 flour. I didn’t have to modify the rest of the recipe and just followed it as is. It worked really well! I would say that it was a bit too sweet for me, so next time I’ll use 1 1/2 cups of sugar instead of 3 cups! Overall 10/10!
★★★★★
Woo hoo! So glad to hear that it worked with a gluten-free modification 🙂
This cake was a hit, but stuck to the well-greased pan. I’ll use parchment next time. Such a delicious cake!
★★★★★
Hi Molly
Thank you so much for this amazing recipe. I have been making this recipe since 2015. I make wedding cakes and it’s my most popular flavour. I get rave reviews. I haven’t had one flip in 8 years.
★★★★★
Sorry sent message before saying a huge thank you.
Much love
Tania ❤️
This cake looks amazing. Has anyone made the filling in advance? Should I refrigerate it and the. Bring it to room temp before using?? Thanks!
Hi Marcy! Yes, I think this would work fine. The filling should essentially be like a thick frosting in consistency – so if you make it ahead, store in fridge, and then give it PLENTY of time to come back to room temp. You want to be able to easily spread it!
Tried this cake tonight and took the three pan recommendation and it turned out great! Very rich. I love that espresso is incorporated into every aspect of the cake. I also appreciated that there was plenty of frosting for the whole cake. The fudge filling is everything!! I could eat a whole bowl of just that!
Thanks for the recipe!
★★★★★
I am SO glad to hear this! Thanks for taking the time to leave feedback!
I’ve had this recipe pinned for quite some time and finally had an occasion to make it. It was well worth the wait and my new go to recipe to impress! The cake layers are so fudgy and moist, as described. The fudge filling is perfectly sweet and chocolatey and the coffee frosting is literally the icing on the cake. I will be sharing this recipe with everyone I know because it deserves to be shared between loved ones year round! Thank you! Ps I was able to get 3 8” rounds with this recipe, followed it exactly.
★★★★★
Thanks for sharing this recipe, I tried this cake yesterday and everyone loved it. that was so yummy! thanks again!
Hello! What is the cup measurement?
This cake! Is extraordinary. I’ve seen it on my feed for ages and I finally got round to making it. It has fast become a firm favorite. The texture of the crumb is just superb and I love how much moisture is in this cake. But the frosting is the star of the show. I baked two layers but cut them both in half and tripled the frosting recipe to make it a four layer behemoth! Hands down one of my favorite cakes of all time!
★★★★★
What an amazing cake! The flavors are outstanding and the balance of cake, filling and frosting meld together beautifully without one overpowering the other. I made the cake 2 days ahead (sealed and refrigerated), then the next day I put the filling in and frosted it and kept it in the fridge overnight to give everything a chance to infuse. The day of the party, I let it sit out to get to room temp and wow was it ever moist! Although my 9” pans are slightly over 1.5” deep, I went with 3 pans as recommended by other reviewers and I’m glad I did. The batter made 3 VERY full cakes and I was able to cut the baking time down to just under 30 minutes (still baking at 300). Since I wasn’t sure on the baking time, I started out with 20 minutes and then watched the cakes like a hawk taking them out the second they were done. I didn’t double the filling, but there was plenty for the layers and there’s enough extra frosting for a batch of cupcakes. Thank you for this fantastic recipe; Proclaimed by two guests as “the best chocolate cake we’ve ever had!” I agree with them!
★★★★★
Have made this many times. Always gets lots of compliments and ooohs and aaahs. Thanks for restoring my belief that chocolate cake can be delicious! I was ready to become a “pie” girl. 🙂
★★★★★
Hiya I was just wondering if you had any experience with freezing it and if so if it affected the fudge middle when defrosted?
Hi there! I have not personally tried freezing this cake. I think it would work, though. I’d recommend looking up the best methods for freezing cakes like this – I don’t see why it wouldn’t work! Good luck